Saturday 9 March 2013

"Design" Trials and Tribulations

Tissue Paper Windows

      In Semester One, I shared Art 9 with the other Art Teacher at my school. She divides her art courses into 4 project areas; Drawing, Painting, Sculpture and Design. In the first semester, for the design component of the course, we did Tissue Paper Windows. It was my first time teaching this particular lesson, and I found many more obstacles and difficulties with this project than I did reward.
      This project was all about designing a simple composition focusing on the positive and negative space, the shapes that make up an object as well as refining some controlled fine motor skills. The process of designing the image with the stained glass effect of the thick black lines is not a bad process and certainly teaches the students some great lessons. The finished products were mostly wonderful, but it very easy to make a mistake, and using the tissue paper was, of course, a very delicate material. Here are pictures of some of the finished student pieces that turned out really nicely.


 Food for Thought:
  • Size: If I were to do this again, I would do it MUCH smaller. I had them working on large pieces of black Mayfair paper, and it just took took long.
  • Simplicity: I would emphasize the importance of keeping the image and the design simple. The simpler the shapes, the nicer the end product was. The majority of peices that did not turn out well were quite complicated, and had too much going on. 
  • Thick lines: Keeping as much of the black paper as possible, and keeping your lines thick is keep to adding the tissue paper. Many students went too thin with lines, and this caused many problems. When they were cutting the black spaces out, the exacto knifes would tear the lines if they were too thin. Secondly, when they were gluing on the tissue paper into the empty spaces, the thin lines gave very little space for error, and so their tissue paper had to be added on very carefully.
  • Stress versus Success: There were so many students who experienced frustration and stress over this assignment and normally, I would say a little frustration is not necessarily a bad thing, but combined with the fact that there were so few students who felt that feeling of pride and success in their finished product, is it worth it?

Notan Designs

      So, second semester, the other art teacher and I were no longer sharing the course. I stuck with her structure of the course, but, I decided to switch it up a little bit. I wanted a project that still stuck with the original "design" objectives, but something that more students could find success in, and more could find a challenge. The wonderful world of Pinterest led me to the Notan Design project.
      I began the lesson with this instructional video that I found on an elementary art teacher blog; Art. Paper. Scissors. Glue!
      Click on the following link to check out the video: Notan Design Blog Post and Video
Begin with a 6 inch x 6 inch square. I suggested black, but left the color open to the students depending on their design and theme that they are trying to convey.  Draw the design with a pencil or white color pencil and color in the shapes that you will be cutting. This is important if your design is complex. If it is a more simple design, this step may be unnecessary.
The next step is to cut it all up. Exacto knifes and scissors both work, preference depends on the student, and the design. I provided the students will baggies to keep all the pieces in, as it is necessary to save all pieces, and some are quite small and get lost easily.
The next step is planning out the layout. Depending on the complexity of the design, there are different ways to attack this part. Because my shapes were all quite similar to each other, and I am a little OCD with artistic perfection, I decided to trace each shape into place and number each shape.
This required patience, but as I said, was not necessary for all designs. Most students found their own ways to keep themselves organized, and those who didn't, discovered quickly the importance of planning for certain projects!
Finished product!
Here are some finished student examples! They all turned out so well!


Food For Thought:
  • Supplies. I really need to figure out a way to keep track of our supplies. During this project two of the most important supplies, glue sticks and scissors, went missing. Students were having to share scissors, and at one point we only have two glue sticks for a class of 25! How do we keep track of our supplies in the art room? How do we encourage students to take care of the supplies we have, for example, returning glue sticks without caps? Any suggestions? 
  • Challenge: This project definitely was not as challenging as the previous terms design project. Some students completed this project very quickly, without feeling the need to challenge themselves at all. Others really took the time to create a challenging composition. Both levels turned out nicely, but I am not sure if the easier route that some students took rests well with me. How can I take a fairly simply project idea, and instill the desire to challenge oneself within my students? Maybe I just need to keep looking for the right design project?

Tuesday 15 January 2013

Layered Landscapes and Artist Pages

     Here are a few recent drawing assignments that I tried out this year! The first is a landscape assignment that I did with my Grade 6 classes, and the second is an artist research assignment that I did with my Grade 9 classes.

Grade 6 Layered Landscapes:

     This assignment had 3 main objectives.
  1. Students will understand and demonstrate how to represent foreground, middle ground and background. 
  2. Students will create an original fantasy landscape incorporating multiple layers and additional images. 
  3. Students will experiment with oil pastels on black paper.
     We began the lesson by talking about foreground, middle ground and background. I had some students pose like statues, and the rest of us pointed out what was closest to us, in the middle and farthest away. We then talked about photographs and how, for compositional purposes, photographers often think in terms of layers to create interesting, deep, visual effects. We looked at a few photographs of landscapes and again, pointed out the layers together. From here, I showed a short video from Youtube called Foreground, Middleground, Background in Art Class (found below), which highlights how layers have been used in many famous paintings to create depth!

     After the video, I did a demo of the project. I begin by talking about landscapes and brainstorming various ideas that they could use. It could be a realistic landscapes, like a beach, or an fantasy landscape, like Candy land. The were to begin by sketching in their sketchbooks an idea for a simple landscape that has the three layers that we discussed earlier. They were to show this to me once they were finished. When a student came to show me their sketch, I had them point out the three layers to me. This helped me to know that they understood the concept and caught those who did not understand early, before they began the final peice.
     Next, they took a black piece of paper and redrew their idea using a white oil pastel.
     The next step, is my favorite part, because the kids always panic when I tell them that they now have to tear it apart. They must, carefully, tear along the lines that they drew so that they have the 3 layers in separate pieces. You could have them cut it apart, but the torn look adds a nice 3D element to the finished piece and helps to break apart the layers a little more. It is important to note here that the simpler the initial drawing is, the easier the tearing will be. They can always add more detail later, but if they make initial sketch too complicated, the tearing will be a disaster. Another tip that I learned from doing this is to have them label each layer on the back so that they know which one is which.
     From here, they get a new sheet of paper, and glue the layers back together. Begin with gluing down the background and working towards the foreground, and overlap each layer by just the slightest. This, again, helps add to the to depth and 3D effect.
     Once everything is glued down, they may now begin to go back into the landscape and add color and detail using oil pastels!
     As an added effect, I had them create two more objects that they wanted to stand out, like a bird, or a cloud. They drew them on a scrap piece of black paper, tore them out and glued them on top of everything else.
     Here are a few of the works in progress! It is difficult to see the layered effect of the torn paper in these images, but in reality, it is quite visible.
     Food for Thought:
  • Some students really rushed this project. The use of the oil pastels was messy, and the layering was unclear. Is this because of the nature of the project? Or is this the nature of a Grade 6 student, as I have seen this with other projects as well in Grade 6? Or is this merely the nature of the specific student? Regardless, how do I encourage thoughtful, attention to detail and finishing quality in Grade 6? I rarely accept an assignment the first time a student comes to me and says that it is finished. I will often give a suggestion for an area of improvement and have them sit down once more and work on that. How can I get them to begin doing more self-regulation?
Grade 9 Artist Pages: 

     This assignment began as a quick sub plan that turned into something much more successful than I thought it would. The objectives of this assignment were:
  1. Students will research and visually represent an artist if their chosing. 
  2. All aspects of the page will represent the artist, such as the style of drawing, the color choices, the media choices, the font, the images, the layout, etc.
  3. The page must also include 5 facts about the artist and 5 facts about the artists artwork.
     So it was a sort of research project with a twist. They student had to visually represent their chosen artist. I told them to imagine the artist was doing this themselves, so every choice that they made had to be based on something they learned about their artist. If they didn't know what colors to use, they had to go find out what kinds of colors their artist normally used.
     Here are a few examples of some finished pieces!
Sorry that the image is sideways, I can't figure out how to rotate it once I get them in here. I will it before next time. :)
This student did not do a visual artist, but rather asked to do a musician. I thought, why not, they are both very pure forms of personal expression, music and art. It turned out nicely.
     The majority of assignments turned out extremely well, and some students began to get really creative with materials. The assignments that did not turn out as well were clear examples of students who had not done the research and who did not really understand their chosen artist.
   
     Food for thought:
  • I think this would be a great assignment to open up for more choice. I really intended it to be a sub plan for 2-4 classes and it ended up taking closer to 8. Because of this I had them do it on plain white paper, and encouraged them to stay with simple media (except for a few who insisted and I could not refuse!) But after seeing the possibilities, why not allow them more freedom in media choice? Sculpture? On canvas? It is Grade 9, and what a great opportunity to demonstrate some higher order thinking skills, individuality, and pushing their own limits?
  • I wonder if the text, the 10 facts, are even necessary to include? I half included that criteria so that I knew that they had done the research, and so that they would really understand the artist, but the majority of students demonstrated their understanding of the artist visually so well, that the words seemed excessive. Maybe this would just be a preliminary criteria, collect the research in your sketchbook, show it me, and somehow represent that information visually as well? I am unsure of this...

Friday 14 December 2012

Parent-Teacher Time and My ClassDojo Discovery!

Parent-Teacher interviews snuck up on me this year. Not sure why, must have been focused on too many other things. About a week before Parent-Teacher, all teachers, all over the world start panicking, each with their own unique reasons. 12 hours straight of interviews, don't have enough marks for the students, have not communicated home yet about issues, the classroom is a disaster, etc. For some reason, I don't panic. I actually look forward to it...

I enjoy a few things about Parent-Teacher interviews. I absolutely love meeting students' parents for the first time. That one 10 minute conversation tells a teacher so much about the student. Gathering information like that, the good and the bad, helps me to a be a better teacher, and helps me to understand and connect with my students. I also love the conversations with the parents. They love talking about their children, if they understand that their child's success is my primary concern, the conversations are positive, friendly, and enjoyable. Now, I have not yet experienced a negative Parent-Teacher conversation, and I am sure that it will happen, but if I keep the interview centered around the child, how can it not stay positive?

Here is a glimpse into my classroom on Parent-Teacher Night!
A nice welcome sign for the parents as they enter the classroom!
And of course, flowers and candy on the table for the parents and students... well, actually, the candy is for me. :)
I always have a slideshow of pictures from the art class since my interviews are usually in my FSL classroom! Good for conversation starters, or distractions if needed! Still need some posters or visuals on that orange bulletin board up top...
My little bunny sculptures in their garden! I love a  bright and colorful classroom!
Parent Teacher Conferences can be very productive too if I use my time wisely! I clean my desk, which I had not seen the surface of since the beginning of the year!
UPDATE! It is messy again... :(
I was also able to get all my TPGPs from the last 4 years hung up by my desk! Good for inspiration and reminders of what I need to work on!
Man, I was so productive this round! I also got my student work bulletin board changed...
...and my homework board which I had been putting off!
Moral? Keep is positive, keep it welcoming, and keep it student centered.

Area for Self-Improvement...

One of my major goals this year (in fact, it is goal #1 on my TPGP), is to communicate more effectively with parents on a more regular basis. I have gotten better this year compared to past years, but I am still not where I would like to be. I have kept D2L (our online tool for news, grades, due dates, etc) up to date, and I have emailed home once to the parents whose child is missing one or more assignments. I would like to email home on a more regular basis, commenting on not only the needs of the students, but also their successes. I need to make this more of a priority for the next few months.

I actually discovered an awesome online tool that could be used for formative assessment, providing feedback for the students and the parents beyond that of assignments and tests. It is called ClassDojo! Teachers can attach a little adorable monster character to each student. The teacher then creates badges, which are worth points! There are positive and negative badges (I'm not a fan of the word "negative", I would prefer "areas of improvement", but I can't change it..). They can be anything that the teacher would like to provide feedback on, for example, "Hard Worker", "Spoke French", "Up to date on all Assignments", etc. Teachers could have it projected during class, and subtly give out badges as students complete them! Teachers can also add comments to the badges, and students can create accounts so that they can log on to see their badges, their points and the attached comments! There is even a Parent email tool! Check it out! I am starting it with my French as a Second Language classes this week! I'll let you know how successful it is!

Monday 10 December 2012

The First Few Days With Grade 6


I have only been teaching Grade 6 for two years. I have approached both years completly different. In my first year, I had two classes, all year long. We had so much time together. All of the projects were done in portfolios, so students were given 3-4 projects centered around a theme, and could work on any of the projects during the class. All the projects would then be due on one date. This year, we organized the Grade 6 classes differently. This year, I have 3 classes, who rotate through Art, Music and Foods. So, I am able to see the students twice throughout the year, but not necessarily twice in a row. This year, I have basically divided up the two sessions in Art into 2D, providing one assignment at a time (drawing, watercolor, collage, etc.) and 3D (mixed media, sculpture, clay, etc.) I am not quite sure which way I prefer, and maybe it depends on the timing and organization.

I really do love the Grade 6 students in the Art room. They are young enough that they don't question their creativity and ideas, yet old enough to create some really amazing artwork. They are excited, and enjoy being in school. They try almost everything I throw at them without worry or complaint, and are quite positive and open when having class discussions. They are ready and willing to learn, which is so beautiful. It is a really interesting age. They of course have their challenges, as any grade does, but overall, I really enjoy teaching this age.

Anyways, I was looking through my pictures and found a few gems from the first few days with my Grade 6 classes that I thought I would share with the world. The first few pictures were from our very first day of school. The Grade 6 students rotated into the art room for about 45 minutes each, and I needed something that was exciting, yet doable for the first time in the art room. I decided to do a large collaborative mural that would have a number of different sections to provide a number of different media and a variety of experiences at different levels of difficulty.
This was an old school sign that was found behind a bookcase! Perfect shape and size for a collaborative mural! I drew out squiggly sections before hand and planned out a a variety of media to use in each section. This was after day 1.
Zentangling on the left, and layered tissue paper with matte medium on the right.
Layered tissue paper on the left and yarn designs on the right.

Magazine roll ups! This station was quite hilarious, because the kids started to battle over who could make the largest, longest roll up. The really long ones unfortunately fell off...
I had anticipated that a lot more of the mural would be finished after day 1, so we turned it into the "I'm Finished" mural! So now, I have the stations in large ziplock bags, so when a student finishes an assignment early, I ask them which section on the mural they would like to work on, grab them the baggie, and they get to work! This way, there is never a student with nothing to do.

I am a little nervous that we are not going to have enough time to finish it. I am going to try and have a day every now and then that we can dedicate to the mural in hopes to get in finished. I guess it wouldn't be the end of the world to continue it next year in Grade 7, but my worry would be that they would get bored of it if it took that long. So the goal will remain to get it done this year. I'll keep you posted!

 The next few pictures that I found were from a few days into Grade 6 Art. I began the year, with short, in class activities that got them playing around with lines, colors and textures. The goals of the activities were not as much to teach specific skills, but more to get them experimenting and playing, not worrying about finished pieces. Secondly, they were to get them comfortable creating spontaneous art together, looking at each others art, and feeling safe in the art room to be creative and make mistakes.

This particular activity was called Abstract Continuous Line Exploration. This how I approaced it.
  1. Students were to grab 3 contrasting colors (any media, colored pencils, crayons, markers, etc). Here we discussed contrast, and why certain colors contrasted with others. 
  2. I told them that when I said go, they were to choose a first color, and begin to fill their page with one, continuous line. Their pencil was to stay on the paper, and they were to play around with shapes and using the entire space. 
  3. I gave them about 30 seconds, and gave verbal encouragement and advice as they drew. 
  4. Next, they were to choose a different color, and do another continuous line over their first. They could follow their previous marks, or cross over them. I gave them 20 seconds for this one. 
  5. They now took their 3rd color, and did one more continuous line with only about 15 seconds. 
  6. They now had to search for shapes that the three lines created and color them in. They could use any colors, patterns, and could choose any shapes, large and small. 
  7. We then got up and took at look at each others. 
  8. Then they got three more colors in a different media. We followed the same directions, except, before adding the next line, they passed their sketchbook to the person to the right. After the final 3rd line, they returned the sketchbook back to the original artist and then completed the final step of finding and coloring in the shapes.

This activity was really fun. It provided some good discussion points on artistic terminology such as abstract, collaborative, continuous lines, contrasting colors, organic versus geometrical lines, etc. It also had them create some extremely spontaneous, and then forced them to work from someone elses spontaneity! It also led us to a number of different in class activities such as continuous line observational drawings, and then blind contour drawing! It would make a really good sub plan as well!

Friday 16 November 2012

Playing Around With Watercolor = A Ton of Fun in the Art Room

Watercolor. What a wonderful media for Middle School Students. It can be so technical when you are aiming to do a detailed painting, yet it can be so freeing when you let students go wild with few restrictions and requirements!

I have done two assignments with watercolor so far, and both have turned out to be some of my favorite assignments of all of them. Here they are.

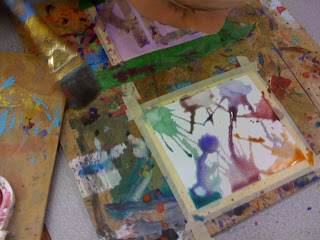
Grade 6 Mini Watercolor Paintings.

I was shown this assignment during one of my practicums in a local junior high school, and fell in love with it. (Thank you Mrs. Cook!) The first two times I did this assignment in my classroom, it was an instant success. I began the assignment with a brief intro about watercolor and the various techniques that I wanted them to play around with.  I then showed them a massive pile of miniature watercolor paper pieces, and told them that they could go wild, and create as many as time allows over 2-3 classes. At the end, they would hand in their favorite 10 for marks. The assignment was a huge resounding success, and it was so amazing to watch it unfold.

Here is how I introduced this assignment the third, and most recent time. "Here are some mini canvases, here is a watercolor palette, a paintbrush and a bucket of water. Go."
The most amazing thing happened. Students created the same kinds of mini paintings, with a variety of colors, patterns, textures, techniques, images, etc. But this time, the experience was even more amazing to watch. Because I did not begin with a demo, the students discovered the techniques themselves! Each discovery was monumentally exciting for the individual, and rippled throughout the class. That discovery, led to another, which led to a related idea. It really was beautiful to watch these students explore the media with no restrictions, uncover techniques and skills all by themselves, produce amazing little artworks, and come back the next class begging to do more.

This assignment is a keeper.
Playing...
Experimenting...
Trying...
Some finished pieces! So different from one another!
More finished pieces...
...and some more finished pieces. Sorry that this picture is upside down, I can not figure out how to rotate it... but it had to be shown! The ninja panda paintings are so great!
Grade 7 Watercolor Doodle.

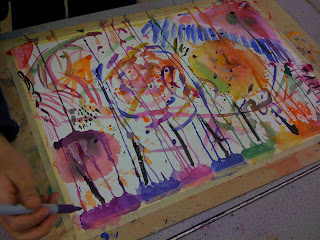
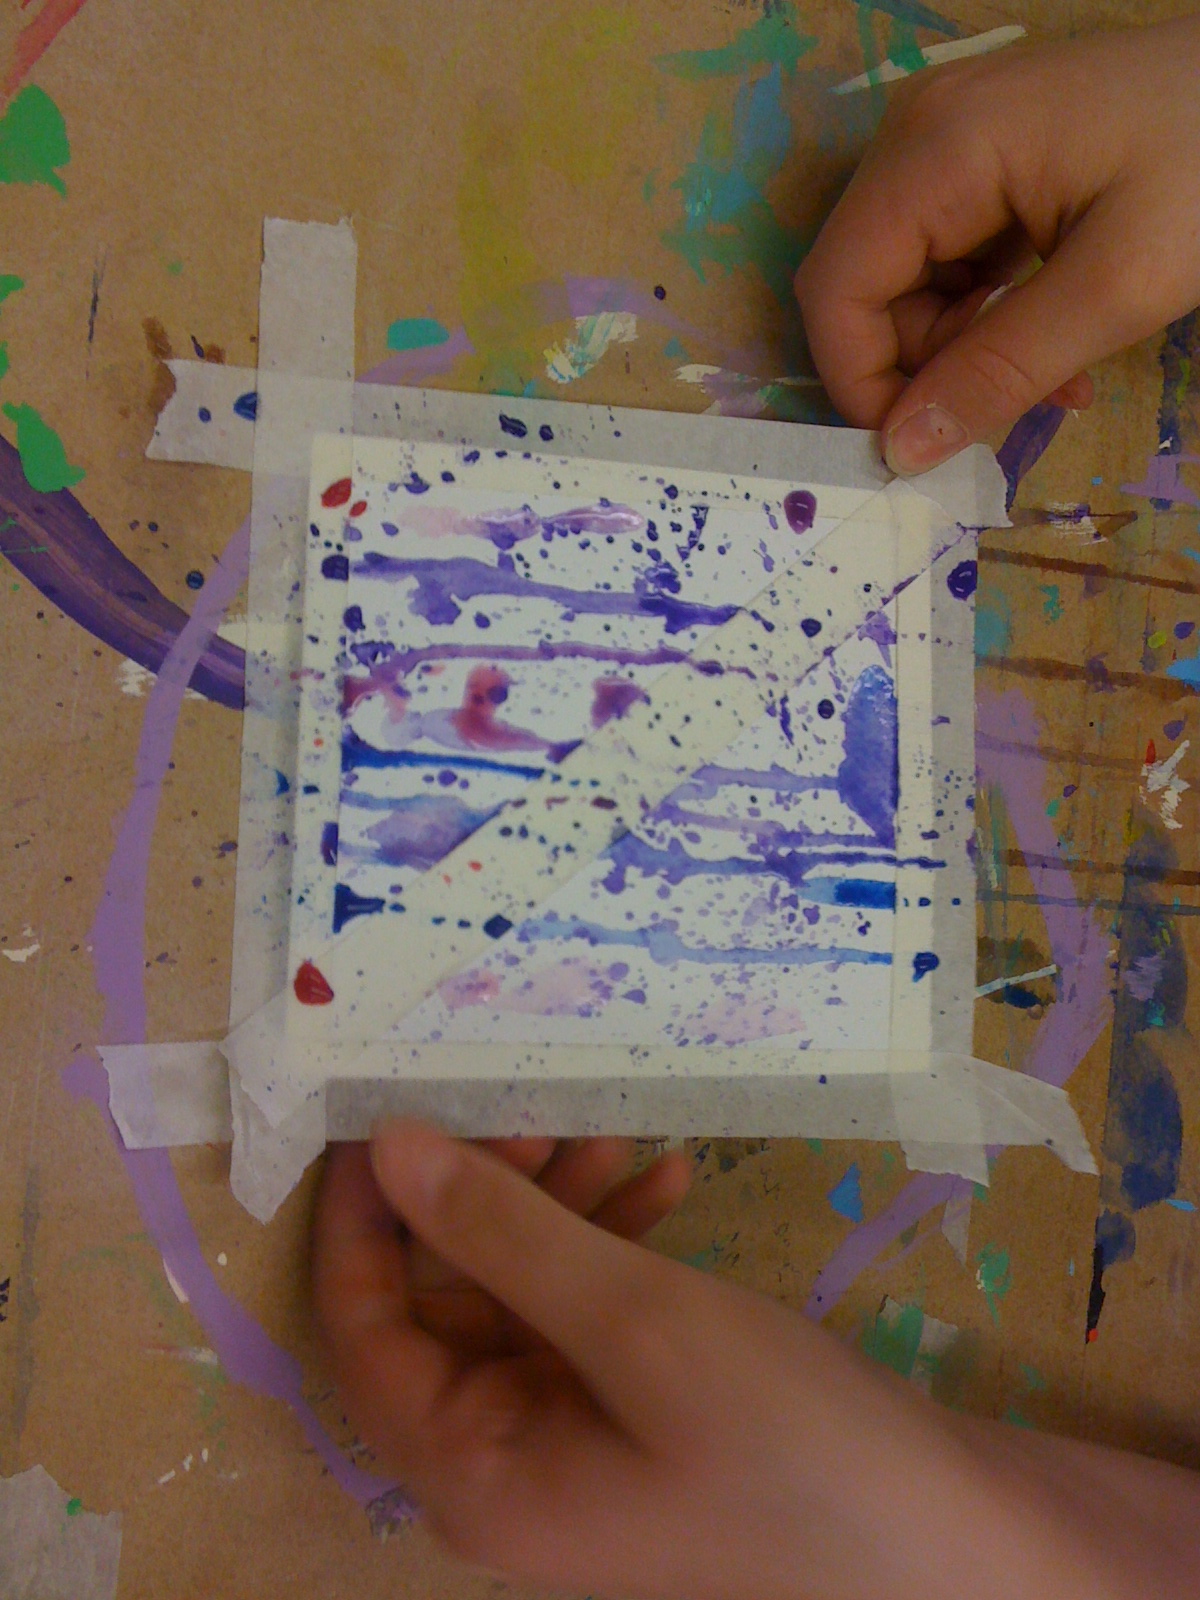
This assignment came about because my first group of Grade 7 Art students was coming to an end and I only had three classes left with them. I knew I needed to do something short, and I knew I wanted it to be a painting project as we had not done any painting projects yet. So I came up with this based on something I had done when I was living in Spain. I used to carry around a small watercolor palette, and I would do these small watercolor abstract paintings. I would then later go back into the painting with a pen and doodle on top. I always loved how they turned out, and it was fun making them because it was abstract, and I never knew how it was going to turn out.

So, at the beginning of the first class, I gave them a large sheet of watercolor paper and gave them a few guidelines. I wanted them to work abstractly, filling up the page with colors, designs and layers of watercolor. The more layered and complex, the more interesting their final product will be. We talked about abstract art a bit, and we also talked about spontaneity combined with thoughtful composition.  
Phase one. Play with watercolor.
At the beginning of the second class, I laid out ton of different colors of sharpies, and I told them that they were now going to doodle on top of the watercolor using sharpies. I asked them to keep in mind the idea of an abstract painting, spontaneity, and thoughtful composition. But this round, the sharpie additions needed to be inspired by their watercolor composition.

A result of phase one, playing with watercolor.

Phase two. Doodle with sharpies.

More doodling.
More doodling.

This one was mine. It started off as a demo piece, but the more I saw the kids pieces, the more I wanted to do on mine! It was so much fun!
The students absolutely loved this assignment. On the course evaluation, it was almost unanimous that this was their favorite project. The loved the freedom that it gave them, and idea of taking experimentation one step further by combining it with composition and mixed media. Once again, a huge success.

This assignment is also a keeper!

The other art teacher who I share the art room with also does a watercolor painting in Grade 8, wear the students paint a scenic background, then add a black silhouette of a something in the foreground. So it seems like a nice progression from Grade 6-8, beginning with complete experimentation, then abstraction, then moving to more detailed realism. 

Questions for Future Improvement:
  1. Does giving guidance and demonstration before hand help or hinder the creative process? I would think that it would depend on what I wanted out of the project. For example, the Mini-Watercolor Paintings, I want to students to have complete freedom resulting in discoveries, so the demo hinders that process a little. The Watercolor Doodle assignment on the other hand requires some guidance in terms of the abstraction with thoughtful composition, and having the doodling work with the watercolor, not against it. Or does it? 
  2. With the Watercolor Doodle assignment, I gave them the instructions in steps, so they did not know that we would be going back into their paintings with sharpies. I quickly discovered that if I was going to keep this a secret, I needed to constantly remind them during the painting phase to keep the colors light, and layered, so that the sharpie would show up. The result was mostly positive, but there were a few students who discovered that they had gone too dark too quickly, and many of the sharpies did not work. Should I have kept the second part a secret? What does it achieve in doing that?